Easy quick steps to organize your email using Microsoft Outlook
Sometimes our emails tend to get out of control where you find yourself scrolling endlessly to find one email and your search starts to resemble scrolling through a Twitter or Instagram feed. If you are like me, you may have a bazillion different subscriptions that just bombard you every day with junk emails. Amazon, Facebook, Twitter, Starbucks… the list goes on and on. Sure you can turn off notifications or unsubscribe for each email but that could take forever. Wouldn’t it be great if you could do all that just using Outlook?
This brief article will guide you on getting yourself and your emails organized easily and effectively.
Using the latest Microsoft Office 365 Outlook desktop application, we will be covering the following:
- Creating Folders
- Creating Rules
- Finding an Email
- Proofpoint Essentials
- Iron Cove Solutions Cloud Services
How to Create a Folder
First, let’s create a folder that we will fill with all our desired emails
- Open Outlook Desktop
- Right Click “Inbox”
- Click “New Folder”
- Name the Folder based on your desired category

- This will create a new folder within your Inbox

- Name the folder based on your desired category
Great! The first step is completed. By creating this folder, it is now available to transfer emails.
Next, Let’s transfer emails to this folder
How to Create a Rule
With the first step, I have created a Facebook folder as an example. We are going to be moving Facebook current and future emails to this “Facebook” folder and we can accomplish this action by creating “Rules”.
- ”Right Click” on an existing email
- Click “Rules”
- Click “Create Rule”

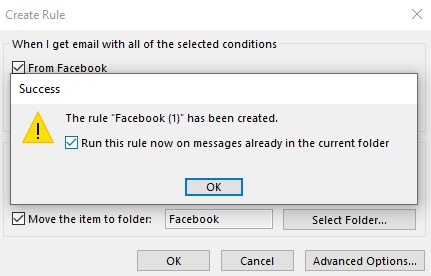
Click the “From Facebook” and “Move the item to folder” checkboxes and then click the “Select Folder…” button. This rule makes all emails arrive with the `facebook.com’ domain will trigger Outlook to merge this email to our new “Facebook” folder.

- Click the “From Facebook” checkbox
- Click the → “Move the item to folder” checkbox
- Assign to “Facebook” folder
- Click “OK”
We want to apply this rule to all emails that have the “facebook.com” domain no matter which folder they currently reside in and to accomplish this we just need to click the checkbox of the dialog window that appears after we clicked “OK” in step #4 from above.
- Click “Run this rule on messages already in current folders” checkbox
- Click “OK”

Congratulations! You just succeeded in assigning all emails with a “facebook.com” domain to your “Facebook” folder and simultaneously filtered a ton of emails out of your “Inbox”.
This simple strategy has helped my team and I organize thousands of emails as well as greatly reduce the clutter.
How to Find an Email
We organized our emails but now let’s show you how to better find a particular email.
The search bar is located at the top left of Outlook

Click on the input field to the right of the magnifying glass icon and Outlook will display a filter dialog box.

Outlook gives you multiple ways to search. You can search by who sent the email, the content in the body of the email, the subject of the email or even search for emails that contain attachments. You can combine search fields to have surgical precision in locating any email.
How can collaboration with Proofpoint Essentials be key?
Emails can carry hidden threats that you may not be able to catch before it's too late. Let's stop them before it happens using Proofpoint.

Proofpoint provides software as a service and products for inbound email security, outbound data loss prevention, social media, email encryption, and email archiving. Proofpoint Essentials is designed to complement Office 365. It provides protection against advanced threats like spear-phishing attacks and ransomware, that Office 365 has no inbuilt protection against. Because Essentials has been designed to specifically work with Office 365, it deploys easily and works seamlessly with existing email infrastructure. It is also cheaper than using Microsoft’s own email security solution for Office 365, offering superior protection at a lower price point.
Iron Cove Solutions Cloud Services
We Integrate and train companies for all of our cloud services! Give us a call at (888) 959-2825 and we can help your IT team become experts in Office 365, G Suite, Okta, Proofpoint and more!

